Introduction[]
Since the hardware version h1.3, my Fast Stacker can control either macro rail (for extreme macro stacking) or motorized telescope focuser. Because most of the hardware is shared between the two applications, I only had to spend an additional 14$ (and a lot of programming time) to have a fully functional motorized telescope focuser, with the following features:
- No menu hierarchy to browse through; all the functions are instantly accessible via 1 or 2 keys commands. The drawback is a bit of a learning curve, but once you learned the main commands the interface is extremely fast. With some practice you can operate the controller blindly.
- All focuser motions have a maximum acceleration/deceleration and maximum speed limits enforced. This allows to minimize the telescope vibrations during focusing, and reduces the load on the focuser's gear.
- Maximum speed 5 mm/s. (Can be made as high as 15 mm/s if desired.)
- The motor torque is large enough to move my 1kg DSLR vertically up. (I haven't tried larger loads.)
- You can still use the focuser manually (when the controller is not connected).
- Positional accuracy is 7.5 um (will depend on your particular telescope model). This is more than sufficient for my Celestron 6" f5 Newtonian, which has the depth of focus 55 um in prime focus.
- Air temperature near telescope is constantly measured and is used to automatically correct all recorded focus positions for changes in ambient temperature. This allows one to "set and forget" focus for all your eyepieces and cameras - you'll never have to focus again. (Well, at least in theory...)
- Can memorize up to 24 focus positions (organized in 6 groups - "memory registers", each register storing 4 "memory points"). It only takes two key presses to initiate travel to any of the 24 points. The points (and temperatures at the time the points were set) are stored in non-volatile EEPROM memory. One can add short description for each point (2-3 characters) in the code, for convenience. It will be shown on the display.
- All motions are fully backlash compensated. (First one has to measure the backlash of your focuser. It is ~0.2mm for mine.) Meaning any Rewind/Fast froward / Make a step / Go to point commands result in accurate final position of the focuser.
- Rewind/Fast forward keys with variable acceleration, plus the ability to make individual steps in both directions with a user-defined step size (7.5 um by default), allows for very precise focusing without a need to touch the telescope (meaning no vibrations during focusing).
- Controller has a backlight with four different levels - no backlight, minimum (good for night time usage), intermediate, and maximum.
- Controller can be operated either from AC adapter, or 8 rechargeable AA batteries.
- Once focused, the controller can be detached from the telescope (without turning it off), to minimize the amount of cabling around the telescope. When you need to refocus, simply attach the controller and do the refocusing.
The total cost is:
- If you start from scratch (so you need to build both the controller and the focuser): 40$ (with shipping included).
- If you already have an up-to-date (h1.3) version of my Fast Stacker macro rail, you only need to spend additional 14$ (shipping included), for the focuser parts.
Hardware[]
In addition to the same stepper motor (8.80$) I am now using in my macro rail, I only had to buy a NEMA 17 motor bracket (2.08$) and a motor - focusing axle coupler (5-8mm in my case; 3$).
I already had the other parts - a small breadboard, RJ-45 (ethernet) socket, a thermistor (just salvaged one from a broken PC's PSU; or one can order 10 pieces for 1$ from ebay), and a resistor of the same impedance as the nominal thermistor impedance (10k in my case). The thermistor's impedance can be anywhere between 10k and 100k. The pair "resistor + thermistor" form a voltage divider, so one of analogue input pins of Arduino can be used to measure the impedance of the thermistor, which in turn is used to compute the telescope temperature.
Why do we care about the telescope temperature? The problem is the tube of the telescope: it expands as the environmental temperature goes up (and contracts when it goes down), moving the sharp focus point closer to (further from) the telescope. For example, the aluminum tube of my Celestron 6" Newtonian (f=750mm) expands by 35 um (the depth of prime focus of my f/5 telescope) for every 2.3C degrees of the increase of the temperature, and by 7.5 um (one microstep of my focuser) for every 0.5C degrees. Meaning that if you don't measure and account for the temperature changes, all focus positions you save will become invalid if you use your telescope with the environment 2.5C degrees colder or warmer.
Here is the schematics of the focuser:

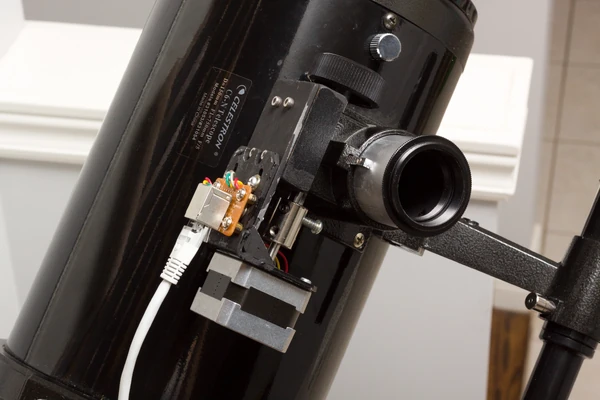
The controller (containing Arduino Uno microcontroller, BigEasyDriver stepper motor driver, Nokia 5110 LCD display, 4x4 keypad, and some resistors and capacitors) is the one I designed for my focus stacking macro rail, Fast Stacker. The controller is connected to the telescope via the same Cat5 (ethernet) cable as the Fast Stacker.
Some photos (thermistor wasn't there yet):


As you can see from the photos, to attach the stepper motor to my telescope, I had to remove one of the focusing knobs, cut a plate from a 3mm tick sheet metal, and find an MDF board of the appropriate thickness to be used as a filler between the motor bracket + my metal plate and the top of the telescope focuser. I replaced the four short M3 bolts securing the top cover of the telescope focuser to the rest of the focuser with much longer ones (M3x35mm), so I could secure my metal plate + the MDF filler to the focuser. Initially this resulted in the focusing becoming too stiff; I had to unbend a bit the springy metal part inside the focuser which is pressing against the focusing axle, to make it less stiff. At the end the focusing could still be done manually using the remaining focusing knob (when the controller is not connected), and the stepper motor had no problem rotating it even with a 1kg camera attached.
Software[]
The Arduino controller runs a single program which can operate either macro rail or telescope focuser (it detects which device it is connected to at boot time). The latest version of my software can be found on Fast Stacker site, on the Software page. The telescope mode is supported starting from the s1.17 version of the software.
You'll have to customize some code parameters (in stacker.h file) to your setup. In particular, set "MM_PER_ROTATION_TEL" to the focusing tube travel distance corresponding to one full rotation of the knob (you don't have to be super accurate here). If my telescope backlash parameter BACKLASH_TEL_MM=0.2mm is too large or too small for your telescope, adjust it accordingly. (Too large is not really a problem - just a bit more of time wasted for backlash compensation; but when it's too small you will not get accurate positions.) You might also want to change the maximum speed SPEED_LIMIT_TEL_MM_S and the breaking distance BREAKING_DISTANCE_TEL_MM. These two parameters together determine maximum acceleration/deceleration experienced by the focuser when in motion; if this acceleration is too large you will see some vibrations of the image. Don't make the maximum speed too high or the focuser will fail to work properly; adhere the following rule: 10^6 * MM_PER_ROTATION / (MOTOR_STEPS * N_MICROSTEPS * SPEED_LIMIT_MM_S) >~ 500 microseconds. Set TEL_LENGTH_MM to the maximum travel distance you will need. Don't make it move all the way out if you don't actually need that - torque can increase dramatically when the focuser with a heavy load is all the way out, which can result in lost motor steps.
You can also put your own labels (1-3 character each) for each of the 24 memorized focus positions ("memory points"), in the Name[N_REGS][15] array (in stacker.h). (Make sure each of the strings contains exactly 14 characters.)
The temperature section in stacker.h is the most difficult one. First you have to put the exact impedance value for the resistor R1, as R_pullup (10.045 k in my case; you have to measure it yourself with a multimeter). Second, you have to compute the three thermistor parameters in the Steinhart-Hart equation, SH_a, SH_b and SH_c. You should do these measurements before soldering the thermistor to the telescope's breadboard. You'll need a reasonably accurate thermometer (digital or glass), and have to place both the thermometer and your thermistor together in locations with different ambient temperatures, roughly covering 0...+30C degrees range. (~0C degrees is conveniently obtained inside a fridge.) At each location you'll have to measure the impedance of the thermistor and the ambient temperature once they both have converged to a constant value (usually after 5-15 minutes). You'll get the best accuracy if you have >3 (best >6) different temperature measurements, more or less equally spaced within the whole interval of temperatures. Then you can use online solvers like http://octave-online.net to find the three parameters (SH_a, SH_b and SH_c) using the least squares method. For example if you have four temperature measurements:
octave:22> R1=9.03; R2=11.94; R3=32.04; R4=9.99; T1=27.2; T2=21.3; T3=-1.05; T4=25.3;
octave:23> A=[1,log(R1),(log(R1))^3;1,log(R2),(log(R2))^3;1,log(R3),(log(R3))^3;1,log(R4),(log(R4))^3];T0=273.15;b=[1/(T0+T1);1/(T0+T2);1/(T0+T3);1/(T0+T4)];
octave:24> ols(b,A)
At the end it will print the three parameters as a column.
It is always a good idea to plot your measurement points and the least squares model fit together, to see if the measurements make sense, or perhaps you made serious errors when doing the measurements. For example, I discovered that my digital thermometer is at least 5 degrees off for the fridge freezer which was supposed to be -21C (it showed -15C) - the model fit didn't look good. Then I double-checked the temperature with a simple glass thermometer, and it showed the temperature the freezer was set to (-21C). I ended up using the glass thermometer value of the temperature for the freezer measurement, and digital thermometer values for 0C and higher. In the plot below, the bad - discarded - temperature measurements are shown in red. Once the bad points were discarded, the rest followed the model very nicely, with an average error (s.t.d.) of ~0.1C degree.

Once your thermistor is calibrated, solder it into the telescope's breadboard. Now you have to measure CTE (coefficient of thermal expansion) of your telescope, by precisely focusing the telescope on a star using one of your high magnification eyepieces, on two different nights, with significantly different ambient temperatures (ideally >10C degrees difference). Store each measurement in a different memory point. Pressing key "D" will show three lines for each memory point of the current register; ignore the first line; the second line is the temperature at the time the point was saved, and the third line is the focus coordinate in mm. Now the CTE for your telescope can be computed as
CTE = -(x1-x0) / (Temp1-Temp0)
(The minus sign is because when the telescope tube expands, focus point moves closer to the telescope, resulting in a smaller coordinate). The larger the difference between the temperatures, the better is the accuracy. Update the stacker.h value of "const float CTE" to the values you have measured. From now on your focuser should always put your eyepieces and cameras in focus, regardless of the ambient temperature. (Assuming that you first focused manually and then saved it as a memory point.)
Initially, when CTE hasn't been measured yet, as a rough estimate you can use the length of your telescope tube in mm (for Newtonians or refractors; double that for reflectors with the focuser behind the main mirror) times the CTE coefficient for your telescope tube (2.36e-5 for aluminum; see here).
Finally, you might wish to modify the value of the DELTA_POS_MAX constant in stacker.h. It is currently set to 2, meaning that after you gave the focuser command "go to the memory position X", if during the observations the temperature changes to the point that the perfect focus drifts away by more than 2 microsteps (15 um in my case), the memory point index in the lower bottom corner of the display starts flashing. If you are not doing an exposure at that time, pressing key "0" will move the focuser slightly to bring it again in perfect focus position, for the current temperature. This can be repeated as many times as needed, if the temperature continuosly changes. (For my telescope, the index starts blinking if the temperature drifted away by more than 1C degree.)
User guide[]
Quick Start Guide[]
- Manually move the focuser to the closest to the telescope position. If it doesn't have a well defined stop there, adding a T-mount camera adapter can provide one.
- Connect the controller to the telescope focuser using a straight Cat5 cable, then power on the controller (from 8xAA batteries module or a 12V 1.5A-2A AC adapter). The controller will briefly display "TELESCOPE", and the focuser will move 1mm away from the telescope. Use #4 command to choose the appropriate level of backlighting.
- Put an eyepiece or camera in the telescope.
- If you haven't previously saved the focus position for this eyepiece/camera to the controller as one of its 24 memory points, do it now: point the telescope at a star, and then use the Rewind/FastForward keys "1"/"A" to find the perfect focus. If acceleration is too large, increase the Accel factor by pressing *A (cycles through the values 1, 3, 6, 9) - this will decrease the acceleration when using "1"/"A" functions. You might also want to go in single microsteps, by pressing #1 / #A keys. (The step size is one microstep by default; you can change it using 2/3 keys.) Load the register you will use to store the memory point (there are 6 registers, each can store 4 positions). E.g. #3 will load the Register 1. (#3/#6/*3/*6/*9/#9 will load registers 1/2/3/4/5/6.) Then save the current position as one of the four memory points in that register: pressing 4/5/6/B will store the position into the memory points 1, 2, 3, or 4. After that you can write back the updated register into the non-volatile (EEPROM) memory, by pressing #2/#5/*2/*5/*8/#8 keys for registers 1/2/3/4/5/6. (If the register is locked you won't be able to save it - you'd have to unlock it first by pressing *4. Then you can lock it again if desired using *4.)
- If, on the other hand, the focus for this eyepiece/camera was already saved as a memory point in one of the 6 registers, then first read the corresponding register (#3/#6/*3/*6/*9/#9 will read registers 1/2/3/4/5/6), and then execute the command "travel to the memory point" you need: keys 7/8/9/C will move the focuser to the points 1/2/3/4 of the current register. If the travel is done in the "bad" (non-backlash compensated; away from the telescope in my design) direction, at the end the focuser will make a small backlash compensation loop. If you already measured the coefficient of thermal expansion for your telescope (CTE) and put it in the code, you will have sharp focus regardless of the ambient temperature.
- When changing the eyepiece or camera, repeat the last step. As it only involves two key presses (load register, go to memory point) it is very fast.