Quick start guide[]
- Test how fast your camera can shoot with the rail (my Canon 50D can do up to 4 fps continuously with a fast memory card), and how fast your flash can recycle at the power level required (less power means shorter recycle time). Usually flashes can do a short sequence very rapidly (a few fps) - useful for one-point stacking with live creatures, but have to be set to lower fps for longer sequences (studio work; usually done with two-point stacking). Specific examples: my flash Yongnuo 560-III + external battery, at 1/16 power, can do at least 30 shots at 4 fps, up to 125 shots at 1 fps, and at least 320 shots when using 0.5 fps. Set the FPS rail parameter (keys "8"/"9") accordingly: the largest allowed value (say, 4 fps) for outdoor one-point shooting, and something like 1 fps or even 0.5 fps for studio work (when a large number of shots will be made).
- Determine the depth of field for your macro lens (will depend mostly on magnification and f-number). This can be done experimentally (shoot a few short focus stacking sequences with varying mm/frame parameter), or estimated theoretically (see e.g. here). Example: my super-macro lens (produces 5:1 equivalent magnification when used in a reversed position on top of three extension tubes), Schneider 28 mm f/4 Componon enlarger lens, has DoF around 50 μm when used wide open (where it is sharpest). Set the μm/frame rail parameter (key "5"/"6") to be equal or a bit less than the DoF of your lens. This will ensure no sharpness gaps in the stacked photo.
- "Outdoor" (single-point stacking) setting. Choose the number of shots to take (N_frames; keys "2"/"3"). Set the tripod with rail and camera attached near the subject. Use tripod knobs for rough positioning, then sideways knob on the Velbon rail and the "1"/"A" buttons on the controller unit to correctly frame the subject and bring it into focus. Use "1"/"A" buttons to bring the focus to the foreground part of the subject, hold your flash with a small softbox close to the subject, and then press "D" on the controller. You can interrupt the stacking at any time by pressing any key on the controller unit. Use function "#D" to move camera back to the last starting position.
- "Studio" (two-point stacking) setting. If doing non-continuous stacking, use "#8" and "#9" to change the two relevant delay parameters (first one is the time for the vibrations to die off - the longer the better; the second one should be longer than the exposure time if not using a flash). Position the camera and the flash, use "1"/"A" keys to bring focus to the foreground of the subject, press "4" to set the foreground point, then use "1"/"A" keys to find the background position, press "B" to memorize it. To double check, you can press "7" and "C" to move back and forth between the two points. Use "1"/"A" and "4"/"B" again if you need to fine-tune/reset any of the points. Once satisfied, press "0" / "#0" to start continuous / non-continuous two-point focus stacking (you don't have to be at that point). As with 1-point stacking, you can interrupt the stacking at any time by pressing any key on the controller unit. Unlike the 1-point stacking case, interrupting 2-point stacking puts the rail in a special "paused" mode. In this mode, you can travel by a single frame (without taking a shot) by using "#1"/"#A" keys, or travel by large - 10 frame - steps, by pressing "1"/"A". Once you move to the last failed frame location, pressing "0" will resume stacking from that frame. Alternatively, you can press "#B" to abort 2-point stacking. In studio mode you can also use the electronic shutter on Canon cameras (see the Electronic shutter section).
One can also do a timelapse focus stacking (multiple stacks separated by a specified time interval), for two-point stacking only. Use keys "*4" to set the number of stacks N_timelapse (if set to "1", timelapse is disabled), and "*7" to set the time interval, dt_timelapse, between the start of each stack (in seconds). If an individual stack duration is longer than dt_timelapse, then all the N_timelapse stacks will be carried out without a pause, one after another. The maximum total length of the timelapse sequence is limited by the ability of the Arduino's millis() timer, which is around 50 days.
Be careful with the timelapse feature - one can inadvertently damage your camera and/or rail if you use some crazy combinations of possible parameters! For example, if one sets up a crazy stack consisting of 9,999 shots (separated by 2.5 um), and then use the maximum 4 fps framerate and the maximum N_timelapse=999, the timelapse shooting will run non-stop with 4 frames per second for 29 days, and will make (or rather will attempt to make) 10 million shots! By that point your DSLR will be long dead (typical shutter lifetime for DSLRs is around 100-200 thousand), and other hardware might also fail (e.g. the two relays in the motor unit).
Display[]
The 6-line, 14 characters per line LCD display (Nokia 5110) has the following layouts:
Main layout[]

Line 1: single-point shooting parameters[]
- Input parameter N_frames (can be modified via keys "2" / "3").
- Total stacking depth in mm.
- Stacking time in seconds.
Line 2: two-point shooting parameters[]
- Number of shots to take (derived self-consistently from the distance between the background and foreground stacking points and the parameter μm/frame).
- Total stacking depth in mm (distance between the background and foreground stacking points).
- Stacking time in seconds.
Line 3: stacking parameters[]
- Parameter μm/frame (use keys "5"/"6" to change it).
- Parameter frames/second (FPS; use keys "8"/"9" to change it).
Line 4: two stacking points[]
- FXXX: coordinate of the foreground stacking point in mm. (Zero is near the foreground limiting switch.) Can be set or reset to the current position by using key "4".
- BXXX: coordinate of the background stacking point in mm. (Zero is near the foreground limiting switch.) Can be set or reset to the current position by using key "B".
Line 5: current coordinate[]
- Normally displays the current position in mm (distance from the foreground limiting switch). Sometimes shows other information.
- When the rail is reversed (after pressing *1), the first character on this line will be "R".
- When running a timelapse stacking, the three last characters on this line will show the current stack number.
- This line will show the three parameters relevant for non-continuous stacking (all in seconds) when the key "#" is pressed: First_delay ("#8"), Second_delay ("#9"), and the estimated stacking time.
- This line will briefly show a message when executing many functions (e.g., when reading from or saving to a memory register; when starting stacking; when pausing stacking, etc.)
Line 6: status line[]
- Status letter: "B" when breaking, "C" when doing calibration, "P" when in a paused mode (interrupted 2-point stacking), "S" when doing non-continuous stacking (initiated with "#0"), "T" when doing timelapse stacking.
- Motion status:
- <- : rewinding to the foreground limiter;
- -> : fast-forwarding to the background limiter;
- > : doing stacking towards the background limiter.
- Current frame: live frame counter during focus stacking.
- Point status: "F" if the rail is precisely at the foreground point, "B" - same for the background point.
- Battery status:
- When compiled with BATTERY_DEBUG macro parameter, shows the voltage per AA battery, multipled by 100. (So 1.25V will show as 125.)
- When compiled without BATTERY_DEBUG macro parameter, shows bitmap images corresponding to 4 levels of a battery charge, from empty to full.
Alternative layout[]
This is the layout when you are pressing the "*" key.
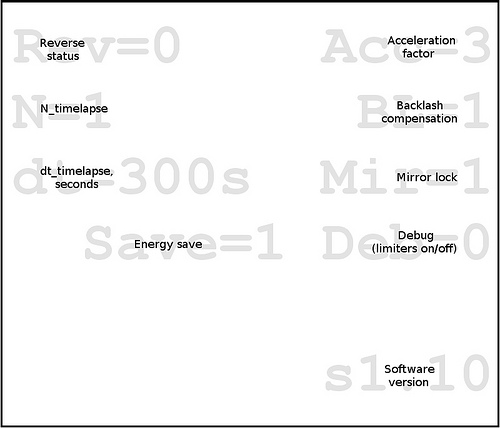
Line 1[]
- Rail reverse status (on/off). Use "*1" to change.
- Acceleration factor. Use "*A" to change. The larger it is, the smaller is the rail acceleration when using "1" and "A" keys.
Line 2[]
- N_timelapse: number of stacks in a timelapse sequence. Use "*4" to change. If =1, no timelapse.
- Backlash compensation (on/off). Use "*B" to change.
Line 3[]
- dt_timelapse: time intervals in seconds between the starting points of individual stacks in a timelapse sequence. Use "*7" to change.
- Mirror lock (0=off / 1=on / 2=electronic shutter). Use "*C" to change the status. Set it to "on" ("1") when mirror lock is enabled in your camera. Set it to "2" when using electronic shutter (only for Canon cameras; see #Electronic_shutter). Only matters for 2-point non-continuous stacking.
Line 4[]
- Energy save (on/off). Use "*0" to flip the status. When off, motor is on even when the rail is not moving (holding torque). Use it for extreme macro as it might improve the positional accuracy (this needs to be tested), and for rails which require holding torque to stay still.
- Debug (limiters on/off). Use "*D" to flip the status. Set it to "on" when 1/A keys cannot bring the rail into the safe area.
Line 6[]
- Software version. Displays the current software version.
Keys[]
My stacker has 16 different functions directly associated with each key on the 4x4 keypad, plus 29 more two-key combinations (starting with the key "#" or the key "*"). The meaning of some keys changes when you are in a "paused" mode. Here is the list of the single-key and two-key functions (they often come in pairs):
Group A: Focus stacking keys[]
| Keys | Main function | "Paused" mode function |
|---|---|---|
| 1, A | Rewind and Fast-forward. The action continues as long as you press the button. These motions (as all the motions in this rail) are done with a limit on acceleration/deceleration (to prevent damage to the rail bearings and the motor), and with a limit on the maximum speed (2.5 mm/s). | Large (10 frames) rewind in back- or fore-ground directions |
| 4, B | Set fore- and background points. | |
| 7, C | Go to to the fore/background points. | |
| D | Initiate one-point focus stacking from the current position (towards background) | |
| 0 | Initiate continuous two-point focus stacking from the foreground point. If the current position is not at the foreground point, the rail first travels there, and then initiates focus stacking while travelling to the background point. | Resume 2-point stacking from the current frame |
| #0 | Initiate non-continuous 2-point stacking, always from the foreground point. | |
| # | Displays the three non-continuous stacking parameters on line 5 of the LCD (First_delay, Second_delay, stacking time) | |
| * | Displays the alternative screen, with all the parameters which can be modified via *X commands. Also shows the current software version, in the right bottom corner. |
Group B: Change parameters[]
One click moves to the next value in a table of values. (The values in the table can be changed inside stacker.h file - only for parameters with more than two possible values.) For the keys 2/3, 5/6, and 8/9, pressing and holding a key will result in a fast skipping through the table; for the rest of the keys one has to click through the table until the required value is displayed. The keys are ignored in the "paused" mode.
| Keys | Function |
|---|---|
| 2, 3 | Decrease / increase the parameter N_shots (only used in one-point stacking). Determines home many shots to take after pressing "D". |
| 5, 6 | Decrease / increase the parameter μm/frame. Determines the linear distance between shots during focus stacking. Should be comparable to the depth of field of the macro lens. |
| 8, 9 | Decrease / increase the parameter FPS (frames per second). Normally the larger the better (faster focus stacking), but is limited by both the camera shutter and the flash recycle time (using flash at lower power will reduce the recycle time). This parameter is ignored in non-continuous stacking (keys #0). |
| #8, #9 | Cycle through the values of First_delay / Second_delay parameters (always increasing). Only used in non-continuous stacking (#0). |
| *A | Change accel_factor (larger values result in lower acceleration when using keys "1" and "A") |
| *B | Turn backlash compensation on or off |
| *C | Turn the mirror lock support on ("1") or off ("0"). Turn this on when mirror lock is enabled in your camera (only for non-continuous 2-point stacking - function #0). When on, shutter will be triggered twice for each position - first one will lock the mirror, the second one will take the shot. Starting from s1.14, there is a new mode - "2" - which enables the electronic shutter (FRSP; only for Canon cameras) support. |
| *D | Temporarily disable the limiting switches (on or off). Use it if the rail gets confused (could happen after a software update) and you need to override the limiting switches, so you can use keys 1/A to bring the rail back in the safe area. |
| *4 | Change the timelapse parameter N_timelapse. When it is set to "1", timelapse is disabled. For larger values, pressing "0" or "#0" will run N_timelapse full stacks in a row. |
| *7 | Change the timelapse parameter dt_timelapse - time interval (in seconds) between the starting times of individual stacks. |
| *0 | Turn the save energy feature on or off. When off, the motor maintains the holding torque when not moving. This is bad for batteries, but can potentially improve the positional accuracy, for extreme macro (10:1 and up). Also turn this off if your rail requires the holding torque to be still when motor is not rotating. |
Group C: Using memory registers[]
To permanently store the current rail state into a custom memory register. Stored in EEPROM (non-volatile memory.) The keys are ignored in the "paused" mode. To know which parameters are currently saved in memory registers, see the structure "regist" declaration in stacker.h .
| Keys | Function |
|---|---|
| #2, #3 | Save to / read from register 1 |
| #5, #6 | Save to / read from register 2 |
| *2, *3 | Save to / read from register 3 |
| *5, *6 | Save to / read from register 4 |
| *8, *9 | Save to / read from register 5 |
Group D: Miscellaneous[]
| Keys | Main function | "Paused" mode function |
|---|---|---|
| #1, #A | Step back / forward one frame (no shooting) | Move to the nearest frame in this stacking sequence in a fore- or back-ground direction |
| #4 | Cycle through two levels of backlighting (none -> full -> none -> ...) | <- The same |
| #7 | Trigger camera shutter once | <- The same |
| #* | Factory reset. Sets all parameters to the initial values, then initiates rail calibration | |
| #B | Emergency breaking. Use it for example to abort rail calibration | Abort 2-point stacking |
| #C | Initiates rail calibration | |
| #D | Go to the last starting point (for both 1- and 2-point shooting); not memorized in EEPROM | |
| *1 | Rail reverse on/off. Switches the rail operation to the opposite one (including stacking direction and the backlash compensation). Use it with lenses which require the camera to face in the opposite direction. |
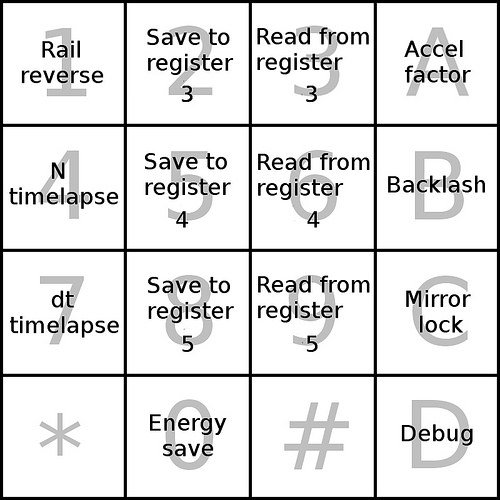
Key maps[]
You can print and carry with you these key maps:
Single-key functions[]

Two-key (# + key) functions[]

Two-key (* + key) functions[]
Single-key functions (in paused mode)[]

Two-key (# + key) functions (in paused mode)[]

Initial setup[]
Camera specific setup[]
The rail was designed to work with any camera which has a wired remote shutter capability, but there may be a need to do some parameter adjustment to make your camera work better with the rail. If your camera only works with a wireless shutter trigger, you still should be able to use it with my rail - if you hack the wireless controller for your camera (by connecting the shutter button in the controller to the output of my rail's two relays).
Connecting camera to the rail[]
The motor unit uses a 3.5 mm stereo phono socket for communicating with the camera. (One can also use a 2.5mm stereo socket, but they tend to be less durable.) You will need to make a special cable to connect your camera to the rail - at one end it has to have a jack matching the remote control socket on your camera, at the other end - a 3.5 mm stereo phono jack. If your camera is a Canon or Nikon DSLR, you can use one of cheap Yongnuo shutter cables (just search for "yongnuo shutter cable canon" or same for nikon on ebay). These cables have a 2.5 mm stereo phono jack, so I replaced it with a 3.5 mm stereo jack. This cable handles two camera triggers - shutter and autofocus. The tip of the stereo phono jack has to be connected to the shutter trigger, the middle zone - to the AF trigger, whereas the base should be connected to the common camera's ground.
If your camera is not Canon or Nikon, your best bet would be to search on ebay for cheap wired remote shutter triggers for your camera's model. For example, a trigger for Sony's A DSLR cameras can be found for as little as 2$ with free shipping. Check this great resource for the ways to make a remote shutter cable for your camera: http://www.doc-diy.net/photo/remote_pinout/ .
You will also need a cheap 3.5 mm stereo phono jack from ebay (1$). And then it is just a matter of soldering it together.
Once you connect your camera to the rail, you can test it by using the "#7" ("take a single shot") function on the rail.
Adjusting software constants[]
You might need to adjust some of the camera-specific constants in stacker.h to optimize your camera's performance. For example, if your camera consistently skips the first shot when doing a fast continuous stacking, you could try to increase the parameter CONT_STACKING_DELAY (current value is 100,000 us = 0.1 s). Or if some shots are not taken at random, perhaps increasing the shutter press time will help (SHUTTER_TIME_US , default value is 0.1 s). You could also try to play with advanced parameters SHUTTER_ON_DELAY and SHUTTER_OFF_DELAY (a delay between triggering the AF switch and triggering the shutter switch, and a delay between releasing the shutter's trigger and releasing the AF trigger, respectively), though the default values (0.005 s) should work for most.
Yet another constant is AF_SYNC. It's default value of "0" results in the camera's AF switch being pressed for the whole duration of continuous stacking (only the shutter trigger goes on and off to take shots). This works on my Canon 50D, and results in a slightly better performance. If your camera doesn't like this feature, you can set AF_SYNC to "1", in which case the AF trigger would go on and off every time the shutter trigger goes on and off. Again, this only affects continuous modes of stacking; non-continuous stacking always behaves as if AF_SYNC=1.
Finally, you should measure the fastest FPS speed your camera + your flash can deliver, and then use that to modify the table for the FPS parameter in stacker.h (make that value the last one), const float FPS[] = {...}. You might want to use a fast memory card in your camera to get the best performance. For example, my Canon 50D can reliably do at least 30 shots in RAW format at 4 fps, using a very fast CF card Lexar 1000x Pro. My flash can also cope with this frame rate at 1/16 power.
Mirror lock support[]
In continuous stacking camera vibrates regardless of whether the mirror is locked or not (so one has to use a flash to eliminate the blur due to vibrations and rail motion), so locking mirror will not accomplish much. On the other hand, it doesn't make much sense not to use the mirror lock feature when doing non-continuous stacking, as the whole purpose of a non-continuous stacking is to minimize camera vibrations.
The only DSLR I have is Canon (50D). The way its mirror lock feature works is (1) you enable the mirror lock in the camera's advanced settings, (2) with the mirror lock enabled, a single shutter press raises ("locks") the mirror, and only the second press takes the shot. My understanding is that Nikon's DSLRs behave the same way. Consequently, I used this model to implement the mirror lock support in my rail. (If your camera's mirror lock works differently, it might not work properly with my rail.)
Specifically, in non-continuous stacking only, if one sets the rail's Mirror lock mode to "1" (function "*C), the rail will trigger the camera's shutter twice per each shot location. First camera moves to the next shot location, then instantly the shutter is triggered to lock the mirror (obviously, you have to enable the Mirror lock feature in your camera first), then after First_delay seconds the shutter is triggered for the second time, to actually take the shot, and then after Second_delay seconds (should be longer than your exposure time) the camera moves to the next frame location, and so on.
Set Mirror_lock to "0" to disable mirror lock support. In this mode, the shutter will be triggered only once per shot, in non-continuous stacking. (In continuous stacking, Mirror_lock is ignored - as long as it is 0 or 1.)
Starting from s1.14, my rail supports electronic shutter (only for Canon cameras; see the Electronic shutter section). The electronic shutter support is enabled by setting Mirror_lock to "2". This feature only works for non-continuous stacking.
Backlash compensation[]
Overview[]
Backlash is an unavoidable issue occurring in many mechanical systems, in particular in macro rails. It manifests itself in physical coordinates not always matching the program coordinates, e.g. every time the direction of motion changes to the opposite.
Starting from s0.10, full backlash compensation is implemented in my stacking rail software. Positive direction (from foreground towards background) is assumed to be a good one (no backlash compensation required); all motions in the negative direction (from background to foreground) require backlash compensation to be accurate (this is manifested by the rail slightly overshooting the target when moving in the negative direction, and then instantly moving forward by the backlash amount). The backlash compensation is implemented in such a way that every time the rail comes to a stop it is fully backlash compensated (so the physical coordinate = program coordinate); also stacking is always done in the positive direction to maintain the accuracy.
The tricky part is backlash compensation for the rewind function (key "1"). I implemented what is likely as convenient as it can be workaround for this functionality: the rewind key emulates the behavior of the fast-forward key ("A"). More specifically, if the current rail coordinate is x, and one presses the fast-forward key "A" for t seconds and then releases it, the rail will travel d mm before coming to a stop, with the final coordinate being x+d. My emulation feature ensures that when one presses the rewind key "1" for the same t seconds and then releases the key, the rail will do a full backlash compensation loop, and eventually stop at the coordinate x-d. In other words, the same amount of pressing will result in the same degree of traveling, with a twist that it will take longer for the rail to come to a complete stop when doing rewind.
If you find the inconveniences caused by the backlash compensation feature outweigh the better accuracy achieved, you can always disable backlash compensation by using the function "*B".
After doing a full rail reverse (function "*1"), backlash compensation switches the direction to the opposite.
Measuring backlash for your rail[]
My backlash compensation algorithm needs to know the largest backlash manifested by the rail, under all realistic conditions. It is okay to overestimate this parameter (the only drawback being all backlash compensated movements will take a bit longer), but underestimation will result in a loss of positional accuracy.
From my measurements, maximum backlash for the rail I am using, Velbon Mag Slider, is 0.2 mm. I use this value in stacker.h. You can leave it as is if you are using the same rail; but if you are using a different rail, keep reading.
It is convenient to make use of the focus stacking functionality of my automated rail to measure the rail's maximum backlash. The procedure is as follows.
- Set up your rail with your camera attached in the most balanced way (this will maximize the backlash effect): make sure the rail is leveled (horizontal), and that the camera is well balanced (not weighing too much on one or the other end of the rail).
- Point the camera with the maximum magnification lens you have (I used 5:1 macro) to a slanted target with lots of nice micro-texture (I used a slanted piece of grey-colored paper).
- Set up proper lighting (a flash, could be with a softbox).
- Disable the backlash compensation (click "*B" until BL=0). Make sure the rail is not reversed (function "*1"; Rev should be =0).
- Use the controller to rewind the rail to the middle point (roughly). Memorize that point as a background point (press "B").
- Move the rail in the positive direction (key "A") by an amount > expected backlash (e.g., by 2 mm).
- Press "C" key to travel back to the background point. As the traveling was done in the negative (bad) direction, the rail thinks it is at the background point, but it actually lagged behind by the amount = backlash of your rail.
- Use "#7" to take the reference shot.
- Use keys "5"/"6" to select the appropriate value for the micron/frame parameter. A reasonable choice would be to set it to 1/2 of the DoF of your macro lens (in my case, it was 25 um).
- Use keys "2"/"3" to select the required number of shots in 1-point stacking mode, N_frames. Make it large enough that the product of this and the previous (um/frame) parameters is large enough to cover any conceivable backlash your rail might have. Say, use 20 to get the stacking length 20x25 um/frame = 0.5 mm.
- Press "1" to move rail further by an amount larger than your likely backlash (say, 2 mm).
- Press "C" to go back to the background point. Now the rail position is backlash compensated, because the movement was in the positive direction.
- Press "D" to start 1-point focus stacking in the positive direction.
- Copy both the reference shot and the N_frames stacking sequence to your computer, process them identically in a way emphasizing micro-texture (high contrast, reasonable amount of sharpening). You might want to do stack alignment for convenience.
- Find which of the stacking shots looks the closest to the reference shot. The number of this shot in the stacking sequence will tell you how large is the backlash of the rail. For example, if the best matching shot is #9 (and numbering starts from 1), the backlash = (9-1)x um/frame, or 200 um in our example (um/frame = 25).
- Assign the backlash value you found to the parameter BACKLASH_MM in stacker.h , and compile/upload the code to the controller.
- Enable backlash compensation (click "*B" until BL=1).
Measuring non-linear backlash factor[]
There is one more backlash related parameter, BACKLASH_2_MM, which is a measure of how non-linear the backlash is, and only affects the current position accuracy after doing a rail reverse (function "*1"). This parameter doesn't affect at all the accuracy of backlash compensation.
One possible way to fine-tune this parameter to your rail is:
- Compile the code with the line "#define BL_DEBUG" uncommented (in stacker.h).
- Now, the keys 2/3 get a new functionality: increase/decrease the BACKLASH_2 parameter. Its current value is displayed (in um) on the right side of the fifth line on the screen.
- Make sure backlash compensation is on (click *B until BL=1).
- Attach maximum magnification lens you have to your camera, attach camera to the rail, point to a contrasty target, illuminate the target with plenty of light, and use Live View to monitor the target.
- Make note where the current focus is on the target, then press "*1" to reverse the rail. Wait until the backlash compensation is done, and compare the new focus position to the original one. If they are different, adjust the BACKLASH_2 parameter (click "2" or "3") and press *1 again.
- Repeat the previous step until you found the BACKLASH_2 value such that the rail position doesn't change after the rail reverse. Convert it to mm (from um), and update the BACKLASH_2_MM parameter in stacker.h accordingly.
- Comment out the "define BL_DEBUG" line in stacker.h, recompile the code. Now the device will use the correct value of BACKLASH_2 parameter, to avoid rail travel when doing the rail reverse.
Electronic shutter[]
Focus stacking is expensive as it wears off the shutter and the mirror moving mechanisms of your camera fairly quickly. (It is common to take >300 shots for a single stacked photo, when doing extreme macro, 10:1 or higher magnification; and DSLR's shutters are typically rated at 100,000 or so shutter actuations). In addition, constant movements of the shutter and mirror mechanisms create additional vibrations which can reduce the sharpness of your macro photos.
The solution: electronic shutter. Some newer cameras (mostly mirroless ILCs) already have this feature. Unfortunately, the popular Canon DSLRs don't, but the great alternative firmware, Magic Lantern, recently added this functionality to many Canon's cameras, starting from 2008 models (like my Canon 50D, or 5D2). They call it "Full Resolution Silent Picture" (or FRSP for short).
Warning: Magic Lantern is a third party alternative firmware which can damage your camera - don't blame me if that happens!
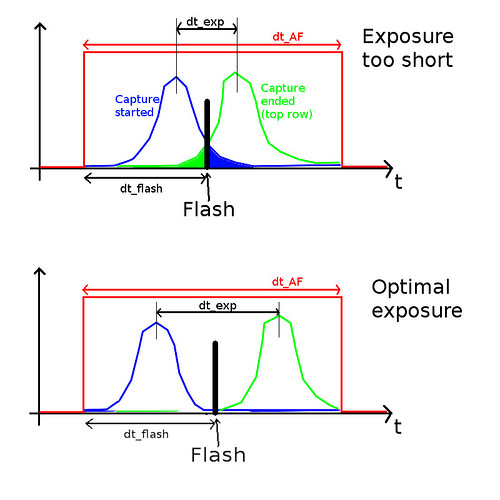
FRSP only works in Live View, and it is a problem for focus stacking, as many (all?) Canon DSLRs cannot trigger a flash while in Live View (and external flash is essential for extreme macro stacking). The reason for that seems to be the fact that in Canon's Live View it takes a fairly large and variable amount of time from the time you press the shutter button until the actual shot is taken. (The spread of delays is likely camera model specific; for my Canon 50D is is ~0.2s.) Fortunately I found a workaround: if you make the camera exposure long enough (comparable or longer than the intrinsic spread of the delays between the shot initiation and the actual capture), you can find such a constant delay between the shot initiation and an external flash triggering that all your electronic shutter photos will be properly exposed by the flash lighting:
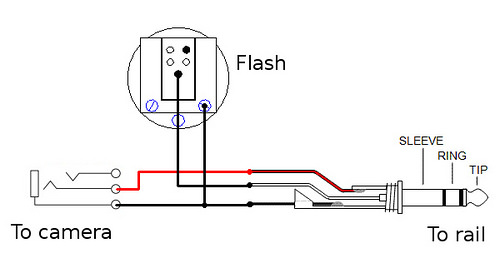
For this to work you obviously need a device which can trigger the external flash with the specified delay after the shot initiation. And here my rail happened to be the match made in heaven, as it is fully programmable and it already has the two relays required for this to work. FRSP is initiated by shutter half-press (AF trigger), so one can redirect the output from my rail's shutter relay to the external flash, and leave the AF relay connected to the camera's AF circuit as before. All this can be accomplished by a simple adapter:
With the hardware side taken care of, the only remaining stuff to do was to change the rail's software a bit, and that's what I did in s1.14 (and newer versions). Specifically, I added a new mirror_lock mode (changeable via #C keys, as usual), mirror_lock=2. This new mode should only be used for non-continuous focus stacking (initiated via #0 keys).
For FRSP + external flash to work correctly, you need to figure out the values of the following three timing parameters for your camera:
- Camera exposure: 1/4s for my Canon 50D. You can start with a fairly large number, and then try to reduce it as much as you can. (When it gets too short, some or all of your electronic shutter photos will not be properly exposed by the external flash light). Very long values are bad because you will need a much darker environment in your studio, and also the noise might become an issue. (Noise is totally not an issue with 1/4 exposure on my Canon 50D).
- Flash delay: the delay from initiating the shot until the external flash is triggered. In mirror_lock=2 mode this delay is given by macro parameter SHUTTER_ON_DELAY2 in stacker.h. You can use a special debugging mode (by uncommenting the line "//#define DELAY_DEBUG" in stacker.h) to figure out the proper value for SHUTTER_ON_DELAY2. (In the DELAY_DEBUG mode, two keys get reassigned: keys "2" and "3" become "reduce SHUTTER_ON_DELAY2" and "increase SHUTTER_ON_DELAY2" functions.) For my Canon 50D the good value of SHUTTER_ON_DELAY2 is 1100000 (or 1.1s).
- Frame rate. Finally, once you figured out the two previous timings, you should find the shortest interval between adjacent shots (the sum of the two non-continuous delays, First_delay and Second_delay - changeable with the keys #8 and #9, respectively) which will result in camera's recording properly all the electronic shots, for realistically large stacks (say, 300 shots in a row). Also, the Second_delay should be longer than SHUTTER_ON_DELAY2; otherwise the flash will be triggered when the rail is already moving to the next frame position. For my Canon 50D, the good values are First_delay=4s and Second_delay=1.5s (meaning each shot will take 5.5s + the rail travel time between shots.) With smaller First_delay values I could take a few silent pictures without issues, but after 60-90 shots this would crash my camera, so only the first 60-90 shots would actually be recorded.
Here is the procedure to determine the above timings parameters. Make sure you always use the same memory card with your camera (it helps if it is a fast card), and that the Long exposure noise reduction is disabled in your camera (or set to Auto; for 50D, setting it to Auto disables the noise reduction for exposures shorter than 1s, which is sufficient for FRSP purposes). Also make sure the camera's screen displays the shot it just took for a short time (~1-2s) - the Image Review option. Set the camera to Manual mode (including the ISO). Do testing in a fairly dark room. Set the external flash to make properly exposed shots when using normal shutter. I did it the following way: attached a DIY pinhole to my camera in place of a lens, placed the external flash right next to the camera facing the pinhole, and chose the flash power (1/128) which would properly expose the sensor. This allowed me to use a fairly bright room, and save on flash batteries. For this testing, I compiled the rail code with "//#define DISABLE_MOTOR" uncommented, so I didn't have to worry about the rail moving back and forth. Set mirror_lock=2 in the rail.
- Set camera exposure to a fairly large value (say, 1s). Enable the FRSP feature in your camera (read this thread for details): install the most recent nightly Magic Lantern build on the camera's memory card, enable ML modules silent_picture and mlv_rec, turn the camera off and on to start the modules, go to the Silent pictures menu and set it to "full resolution" and "MLV" format, then start Live View. When you half-press the camera's shutter a silent picture will be taken, and then the camera's screen will turn black. Now the camera is fully ready to take FRSP shots, either one or as a stacking sequence. (Do not do timing tests when the camera's screen is enabled - the timings will be all wrong. Instead, you should always half-press the shutter first, and then you can do as many FRSP test shots as you want.) All FRSP shots will be recorded as individual frames in a single large MLV file. (Once MLV becomes larger than 4GB, it will split into 2, 3 etc. segments, each ~4GB large.) If you want to stop recording to the current MLV file, and start a new MLV file, you can go to the ML menu, disable and then enable again the Silent Picture mode. (Simply leaving the Live View mode will not start a new MLV file!) You can unpack MLV files into individual raw (DNG) frames using Windows/Mac software MLV Mystic.
- Recompile the rail with "//#define DELAY_DEBUG" uncommented. Use keys 2/3 to change the current value of SHUTTER_ON_DELAY2 macro parameter. Start with a small value (say, 0.1s), and then increase it by steps ~0.1s. Test each value by making a FRSP shot (press #7 keys). Make sure the camera's screen is black before pressing #7; if not, half-press the camera's shutter first, and wait until the screen is black. Have at least 6s between silent pictures (#7 presses). When SHUTTER_ON_DELAY2 is too short, all frames will be unexposed (you'll briefly see grainy noisy image on the camera's screen). Starting from a certain value, all frames become properly exposed. Once the value becomes too large, some or all frames become unexposed again (and some might be fractionally exposed, the rest of the frame being black). Your task is to find the smallest SHUTTER_ON_DELAY2 value consistently producing properly exposed silent pictures. If you cannot find any good SHUTTER_ON_DELAY2 value at this point, your camera exposure is probably too short. Increase it, and run the tests again.
- Set SHUTTER_ON_DELAY2 to the shortest good value you found, and start reducing the camera's exposure, while taking silent pictures (#4), with the same precautions as before (at least 6s between shots, only shoot when the camera screen is black). At some point, when the exposure time becomes too short, you will start seeing either partially or fully unexposed frames. Find the smallest exposure value which consistently produces well exposed shots. (It is 1/4s for canon 50D.)
- Make a more vigorous testing of the two parameters you just found, exposure time and SHUTTER_ON_DELAY2, by running long stacking sequences. Set Second_delay (#9) to a time slightly longer than SHUTTER_ON_DELAY2, and choose such First_delay (#8) that the sum First_delay + Second_delay is at least 8s. Set microns/step parameter to a value you'd normally use (say, 5um), and then set the foreground and background points to get the total number of shots (in two-point stacking) to be 300 or so. Start non-continuous two-point stacking (#0); again, first make sure the camera screen is black. You can monitor the progress on the camera's screen. If you start seeing partially exposed or unexposed frames, abort stacking (press any key, then #B), then increase a bit the camera exposure time (and perhaps the SHUTTER_ON_DELAY2 parameter), and then try again. You should be able to reach a point when there are no black frames in a 300-shots stack. (Double check that on your PC, after unpacking the MLV file.)
- Now you can start reducing First_delay value (#8), and then repeating the stacking test. Once it becomes too short (<5.5s for Canon 50D), the camera will only record some of the shots (this can be detected only in your PC, after unpacking the MLV file; the camera's screen will appear to work fine even if shots are no longer recorded to the card). After that the camera might need to be power cycled. Find the shortest First_delay value when you can consistently produce good long (~300 shots) stacks.
All this sounds like a lot of work (and indeed it is), but this only needs to be done once, and then you can use FRSP with the above three parameters for all your studio focus stacking needs, essentially for free! (No wearing off of the camera's shutter and mirror mechanisms.)
Operating the device[]
Rewind / fast forward functionality[]
The two most used keys in the rail are "1" (rewind - moving camera in the negative direction, towards foreground) and "A" (fast forward - moving camera in the positive direction, towards foreground). The rail moves as long as you press one of these two keys, and comes to a stop once the key was released.
As with all rail motions, the maximum acceleration/deceleration limit and maximum speed limit apply. The maximum speed limit is 2.5 mm/s. The acceleration/deceleration limit is the maximum value encoded in stacker.h (derived from BREAKING_DISTANCE_MM and PEED_LIMIT_MM_S) divided by the current value of the accel_factor parameter. The latter can be modified at runtime using the keys "*A", with the possible values 1, 3, 6, and 9.
When accel_factor=1, rail moves with the largest possible acceleration/deceleration when rewinding or fast forwarding. This is good for speed, but bad for positional accuracy and camera vibrations after the rail stops. Use this value when doing low-magnification macro work (around 1:1).
When accel_factor=3, the acceleration/deceleration when rewinding/fast forwarding is three times lower, resulting in more accurate positioning and less vibrations, but with longer travel times. Use this setting for intermediate magnifications (3-8:1).
When accel_factor=6, the accelerations/deceleration is 6 times lower, making the rail operation substantially slower, but resulting in the maximum possible positional accuracy and minimum camera vibrations. Use it for extreme macro (10:1 and up).
The accel_factor=9 value is reserved for macro 20:1 and higher and for the telescope focuser mode. It gives you a fine control at a single microstep level.
As rewinding (key "1") is done in the negative (not backlash compensated) direction, each press of this key will result in a full backlash compensation loop - if backlash compensation is enabled. (The rail will overshoot by the BACKLASH amount - 0.2mm - and then come back.) This is not the case with the key "A" (fast forward), where no backlash compensation is needed. For convenience, the software makes sure that the same amount of pressing both "1" and "A" keys results in the same amount of the rail traveling, in the corresponding direction. (With the twist that it takes longer for the rail to come to a complete stop after using the rewind function, "1", because of the backlash compensation loop.)
When the rail is reversed (after pressing the "*1" keys; the symbol "R" is displayed at the beginning of the fifth line), "foreground" and "background" are swapped. (So if before the reverse pressing the "1" key would move the camera to the left, after the reverse the same key will move camera to the right.)
Changing parameters[]
Many of the rail parameters can be changed at runtime, by using the corresponding keys. (See the Keys section.) The three most important parameters - number of shots in a single-point stacking, distance between adjacent shots in a stack, and the frames per second parameter for continuous stacking - have two single keys assigned for each parameter (or six keys in total: 2/3, 5/6, and 8/9). One of the two keys reduces the value of the parameter; the other one increases it. Each click on a key results in a move to the previous or the following values in the table of values in stacker.h. If one presses and holds a key, after a small initial delay one goes through the table at a fast pace until the key is released, or until one hits the upper or lower limits of the table. These features should make the adjustment of the three parameters very fast and convenient.
The rest of the rail parameters have only one key or key combination per parameter. A single key press results in a single step move in the corresponding table in stacker.h, in the larger values direction. No "press and hold" mode is present. Once the largest value is reached, the next click will go back to the beginning of the table (the lowest value).
Some parameters have no associated table in stacker.h, as they only have two possible values (on or off).
The current values of all the parameters (with one exception - the Debug function "*D") are saved to the non-volatile memory (EEPROM), and are restored after power cycling the rail. Most of these parameters can also be saved to one of the five custom memory registers, which are also written to EEPROM.
Foreground and background points[]
Two-point stacking (continuous, non-continuous, and timelapse) requires two special points to be set: foreground point and background point. Use keys "1" and "A" while monitoring the camera's Live View to find a good location for the foreground point; use the key "4" to save the current location as the foreground point. Same with the second - background - point, only use a different key - "B" - to store it. You can always come back to the foreground point (by pressing the key "7") and/or to the background point (by pressing the key "C") and then use "1"/"A" keys followed by "4" or "B" keys to fine-tune and reset either of the two points.
The coordinates of the two points are always stored in the non-volatile memory, so will be remembered after power-cycling the rail. They are also saved in custom memory registers (also using non-volatile memory).
Focus stacking[]
Single-point stacking[]
Single-point focus stacking is initiated by pressing the "D" key. It is a continuous stacking (camera keeps moving and shooting at the same time, without stops), so using a flash is essential to eliminate the motion blur. Once the key is pressed, the software will use the current values of the three main stacking parameters - number of shots to make, N_shots (changeable with "2" and "3" keys), distance between shots, μm/frame (changeable with "5" and "6" keys), and the frame rate, FPS (changeable with "8" and "9" keys), to commence focus stacking from the current point towards the background. The first shot is taken at the location where the "D" key was pressed.
The top line of the default screen shows the three important single-point focus stacking parameters: N_shots, the total stacking length (mm), and the total stacking time (seconds). As the stacking is underway, the current frame counter (at the bottom of the screen) is constantly updated.
Single-point focus stacking can be aborted at any time by pressing any key. (There is no pause feature in this mode; see the Pause feature section below.) One can move camera back to the starting point of the last single-point focus stacking by pressing the keys "#D".
As there is essentially no setup involved, the single-point focus stacking mode is the most suitable for shooting live insects outdoors.
Continuous two-point stacking[]
Continuous two-point stacking is initiated by pressing the "0" key. As the name suggests, it is a continuous kind of stacking, so a flash is required to eliminate the motion blur resulting from the camera moving and shooting at the same time. First one has to set the foreground and background points (see above), and set the values for the two stacking parameters - distance between shots, μm/frame (changeable with "5" and "6" keys), and the frame rate, FPS (changeable with "8" and "9" keys). The parameter N_shots is not used in this mode. (Number of shots is derived self-consistently from the coordinates of the two points and the μm/frame parameter.)
Two-point stacking is always done in the background direction. The rail doesn't have to be at the foreground point when you press the "0" key; if the rail is not at the foreground point, it will first automatically travel to the foreground point.
The second line of the default screen shows the three important two-point focus stacking parameters: number of shots to take, the total stacking length (mm), and the total stacking time (seconds). As the stacking is underway, the current frame counter (at the bottom of the screen) is constantly updated.
This mode can be paused by pressing any key (see the Pause feature section below).
Compared to the single-point shooting, the two-point stacking mode gives you more control (you specify exactly the starting and the ending point for the stack), with the drawback that it takes longer to set it up. As a result this mode is more suitable for a studio setting, and not particularly suitable for live insects.
Non-continuous two-point stacking[]
Non-continuous two-point stacking is initiated by pressing the "#0" key combination. As the name implies, this mode employs a non-continuous (move - pause - shoot - pause - move again) mode of focus stacking, which can be done with both flash and continuous lighting. As in the continuous two-point stacking, one has first to set the foreground and background points. There are three important parameters here: distance between shots, μm/frame (changeable with "5" and "6" keys), the length of the first pause in seconds, First_delay (changeable with the "#8" keys), and the length of the second pause in seconds, Second_delay (changeable with the "#9" keys). The first delay should be long enough to let the camera vibrations caused by the rail motion and camera's mirror locking (see below) to settle down; the second delay should be longer than the chosen exposure time. The non-continuous stacking, similarly to the continuous two-point stacking, always starts from the foreground point; if the rail wasn't at the foreground point when you pressed "#0", it will travel there first.
As this mode is all about minimizing the camera vibrations, it makes a total sense to always use the camera's mirror lock feature, in which case the rail's Mirror Lock feature should also be on (use "*C" to set Mirror_lock to "1"; this is the default). This will result in the rail triggering the camera's shutter twice for each location. The sequence of events is "move camera to the next shot position - trigger the shutter once to raise the mirror - wait for First_delay seconds - trigger the shutter for the second time to take the shot - wait for Second_delay seconds to make sure the exposure is over by the time the rail starts moving again" and so on. The rail's Mirror Lock feature has no impact on continuous focus stacking modes (either single or two point).
If you have a Canon camera, with the non-continuous two-point stacking you can also use the electronic shutter (or Full Resolution Silent Picture, FRSP for short) feature of the alternative firmware Magic Lantern, by setting the Mirror_lock parameter to "2" (use *C key). The electronic shutter can be used with or without an external flash. You'll need to make a simple adapter for the electronic shutter to work (see Electronic_shutter for the details).
When pressing the "#" key, the fifth line on the default screen is replaced with a line with three following numbers: First_delay, Second_delay, and the estimated total time for non-continuous stacking (in seconds). The total stacking length is the same as for continuous two-point stacking (the second number on the second line of the screen).
This mode can be paused by pressing any key (see the Pause feature section below).
Timelapse mode[]
Timelapse stacking consists of more than one stack executed one after another, with a specified time interval between the starting times for each stack. Timelapse stacking can be done using either continuous or non-continuous two-point stacking modes. (Single-point stacking is not supported.) There are two related parameters: number of stacks to perform, N_timelapse (changeable with the "*4" keys), and the time interval between the starting times of each stack in seconds, dt_timelapse (changeable with the "*7" keys). By default N_timelapse=1, meaning the timelapse mode is disabled. Once N_timelapse is set to a value larger than one, next time you press "0" or "#0" keys, timelapse stacking will commence, utilizing either continuous or non-continuous two-point stacking modes, respectively.
When the timelapse stacking is underway, the last number in the fifth line on the screen continuously displays the current stack number, whereas the current frame (within the current stack) is being displayed in the usual spot, in the bottom line.
This mode can be paused by pressing any key (see the Pause feature section below).
Use this mode when there is some slow time evolution in your macro subject - for example, for slowly opening flower buds.
Pause feature[]
The pause feature implemented in my software is one of its strongest selling points - I am not aware of a feature of this kind implemented in either commercial products (Cognysis StackShot) or other similar Arduino based DIY projects (Rylee Isitt's stacking controller, Stackduino etc.).
In my rail one can pause focus stacking operation by pressing any key. This can be especially handy when you are doing super or extreme macro stacking, with magnifications 5:1 and up, which typically require hundreds of individual shots to obtain a useful depth of field. With such long stacking sequences the chances that something goes wrong are fairly high. For example, the camera's memory card runs out of space; or the camera or flash battery dies half way through the stacking; or your flash gets too hot and turns off because of the thermal protection. In all those case my rail's ability to pause stacking, and then move camera back a few shots to the point where the first failed shot was taken is very valuable, potentially saving hours of your time and hundreds of shots which would have been otherwise wasted.
When the rail is in the Paused state, the status letter displayed at the left bottom corner of the main screen is "P". If the rail was moving from one frame to another frame positions when it was paused, it will automatically move back to the last taken shot position, with a proper backlash compensation (if it is enabled).
In this mode, most key presses are ignored, and some of the keys which do work have a different function. Here is the list of the functions which can be performed while paused:
- "0": resume stacking, taking the first shot at the current position.
- "#B": abort stacking.
- "#7": take one shot at the current location.
- "#4": turn the backlighting on/off.
In addition, the following functions are available only when paused in the middle of active stacking (not while traveling to the starting point for the stack, and not while waiting between stacks in a timelapse mode):
- "#1" / "#A": move camera to the previous / next frame positions, with backlash compensation if enabled.
- "1" / "A": move camera 10 frames back / 10 frames forward, with backlash compensation if enabled.
With the last four commands, the frame counter is properly adjusted to reflect the current frame position.
What exactly happens when you initiate the pause (by pressing any key) depends on the current stacking mode.
Single-point stacking[]
Single-point ("outdoor") stacking, initiated by pressing the "D" key, is the only stacking which doesn't have the pause feature. And the reason is fairly obvious: single-point stacking is aimed at shooting live insects outdoors, where (a) total number of shots you take is limited by the ability of your camera/flash to shoot rapidly (4 fps for my camera) and the short time you can reasonably expect the live insect to remain motionless, - likely no more than 30 shots per stacking, so a pause feature is not really needed, and (b) pausing stacking of a live insect is kind of pointless - by the time you fixed your issue (changed battery e.g.), the insect is likely gone.
Instead, pressing any key during a single-point stacking aborts the current operation. One useful feature here is the function "#D" which will rewind the rail to the starting point of the last stacking sequence. So if you are lucky and the insect is still there after aborting the stacking and fixing the issue, just press "#D" followed by the usual "D" to restart the single-point stacking from the same point.
Continuous two-point stacking[]
Continuous two-point stacking (initiated with the "0" key) can be properly paused by pressing any key.
If the pause happened during the initial rail travel to the starting (foreground) point, the rail will safely come to a complete stop, with only the keys "0" (resume stacking), "#B" (abort stacking), "#7" (take a shot), and "#4" (change backlighting level) operational. If the pause took place during stacking, additional commands "#1" / "#A" and "1" / "A" (moving the camera by one or 10 frames steps) are also available.
Non-continuous two-point stacking[]
This mode is initiated with "#0" keys, and can be properly paused by pressing any key. The pause behaviour is the same as with the continuous two-point stacking (see above), with the additional twist that if the Mirror Lock feature is enabled on the camera and on the rail (function "*C"), and the pause happened at the time when the mirror was locked, shutter will be triggered once to lower the camera's mirror into its normal position.
Timelapse mode[]
Timelapse stacking can be performed with both continuous and non-continuous two-point stacking modes (keys "0" and "#0"), and is enabled by setting the parameter N_timelapse to a value larger than one (function "*4"). It can be properly paused by pressing any key at any time.
If the pause happened while stacking, the situation is identical to the pause in continuous and non-continuous stacking described above. If the pause was initiated while the rail was waiting between two different stacks, only the basic pause keys ("0", "B", "#7", "#4) are available.
Warning: pressing "#B" while paused in the timelapse mode will abort the whole timelapse sequence, not just the current stack.
Another warning: the timelapse time counter keeps working while paused. So when you pause while waiting between stacks and then resume timelapse shooting, the next stack will start when it was supposed to before the rail was paused. If we are already late for the next stack because of the pause, the next stack will start instantly.
Using memory registers[]
Fast Stacker software provides the ability to save the current state of the rail to one of the five memory registers in non-volatile memory (EEPROM) with a single two-key command, and then to read the state from the register using another single two-key command. Currently the following parameters are saved (the up-to-date list can be found in struct regist declaration in stacker.h):
- N_shots;
- μm/frame;
- FPS;
- First_delay;
- Second_delay;
- accel_factor;
- N_timelapse;
- dt_timelapse;
- mirror lock;
- backlash on/off;
- rail reverse state;
- save energy;
- foreground point;
- background point;
To save to / read from the registers 1, 2, 3, 4, and 5, the following pairs of commands are used: "#2"/"#3", "#5"/"#6", "*2"/"*3", "*5"/"*6", "*8"/"*9", respectively. These commands are only accessible when the rail is at rest, and is not performing stacking (either active or paused).
Rail reverse state is one of the saved parameters. If the register you just read from has the rail reverse state opposite to the current one, the rail will automatically perform a backlash compensation loop (if the backlash compensation parameter stored in the register is set to "on").
Memory registers are very convenient for storing specific, frequently used combinations of the rail parameters (usually for specific lenses and/or specific macro subjects).
Rail reverse[]
All the rail directional operations (direction of the rewind/fast forward, stacking, backlash compensation) can be reversed with the function "*1". Press it again to go back to the original state. If the backlash compensation is on, each rail reversal results in a backlash compensation loop, to keep the rail coordinates accurate.
In the default state, the screen has an empty character at the beginning of the fifth line. In the reversed state, that character displays "R" (for "reversed").
The current reverse state is stored in EEPROM, so will be remembered after power-cycling the rail. It is also stored in custom memory registers.
Use this function with certain lenses which require the camera to face in the opposite direction.
Rail calibration[]
The very first time you turn on the device, a full rail calibration will be performed. But first, a warning will be displayed:
Calibration
Once you press any key, the rail will travel in the positive direction (from foreground to background) until the corresponding limiting micro switch is triggered. Then the rail will break safely (with the limiting acceleration - that's why you have to leave enough of space for the rail to travel - from the moment it hits the switch until it hits the physical limit), and then will travel all the way back until it hits the opposite limiting switch. Then it will break again, and travel back into the safe area. The whole process will take between 25 and 50 seconds, depending on the initial rail position.
The calibration stores the coordinates corresponding to the two limiting switches to non-volatile (EEPROM) memory. After the calibration, the rail should never trigger either of the micro switches in the course of normal operation: when rewinding (keys "1"/"A") or doing a single-key stacking (key "D"), the rail will break safely and stop right before hitting the corresponding switch.
With time calibration might get lost, resulting in the rail triggering one of the micro switches while rewinding or stacking. If that happens, a partial calibration is instantly initiated: the position of the switch which has just been hit will be recorded, the usual warning will be displayed, and once you press any key the rail will travel to the opposite switch until it is triggered, and then will travel back into the safe area.
One can always initiate a full calibration manually, by using the keys "#C". The usual warning will be displayed, and then the rail will run the full calibration cycle (same as when the rail was used for the first time).
Finally, a full calibration (with the standard warning) will take place after a factory reset (keys "#*").
Factory reset[]
Key combination "#*" initiates a full factory reset, which will bring the rail to the same state it had initially, when you powered it on for the first time. Warning: this will erase all the EEPROM data, including the five memory registers. Factory reset is automatically followed by a full rail calibration.
You have to do a factory reset every time you upgrade the rail's software to a new version, right after the upgrade. Failure to do so may result in some erratic rail behaviour.
Emergency breaking[]
Use the command "#B" to request an emergency breaking while the rail is moving - when running calibration ("#C"), when rewinding /fast forwarding ("1" / "A"), or when traveling to the foreground or background points ("7" / "C"). The status character (bottom left corner of the screen) will briefly display "B" when breaking. The breaking will be performed with the current deceleration limit.
The keys "#B" have a different meaning in the Paused mode (when paused while doing stacking) - there they are used to abort stacking.
Miscellaneous functions[]
Use "#1" / "#A" functions to move the rail exactly one "μm/frame" towards the foreground or background, respectively (when the rail is not paused). When paused, the behaviour is slightly different: pressing "#1" / "#A" will move the camera to the previous / next frame location in the current two-point stacking sequence.
Use "#4" keys to turn on and off the backlighting of the screen. The current state is saved in EEPROM (but not saved to memory registers).
Use "#7" to trigger the camera's shutter once. Useful for testing the exposure before firing up a stacking sequence.